Sunday 21 February 2016

Learn about JDK9 Compact Strings (Video review Charlie Hunt)

JDK 9 introduces a new feature called Compact Strings.  Given the ubiquity of Strings in Java programs I feel that this is a really important change that needs to be understood by all Java developers.

In this video Charlie Hunt explains the history and implementation of this new feature.  The video is not actually about Compact Strings. Compact Strings are only introduced as a case study to explain how with a lot of work, the three legged stool of, latency, throughput and memory footprint can all be improved together.

If you have the time I definitely recommend watching the whole video - although the actual part on Compact Strings start at 26:24.

If you want a 5 minute overview here are the highlights:

  • String density (JEP 254 Compact Strings) is a feature of JDK 9.
  • Aims were to reduce memory footprint without affecting any performance - latency or throughput as well maintaining full backward compatibility.
  • JDK 6 introduced compressed strings but this was never brought forward into later JVMs.  This is a complete rewrite.
  • To work out how much memory could be saved 960 disparate java application heap dumps were analysed.
  • Live data size of the heap dumps were between 300MB and 2.5GB.
  • char[] consumed between 10% and 45% of the live data
  • vast majority of chars were only one byte in size (i.e. ASCII) 
  • 75% of the char arrays were 35 chars or smaller
  • On average reduction in application size would be 5-15% (reduction in char[] size about 35-45% because of header size)
  • The way it will be implemented is that if all chars in the String use only 1 byte (the higher byte is 0) then a byte[] will be used rather than char[] (IS0-8859-1/Latin1 encoding).  There will a leading bye to indicate which encoding was used.
  • UTF8 not used because it supports variable length chars and is therefore not performant for random access.
  • private final byte coder on the String indicates the encoding.  Note the room to support many more encodings in the future.
  • For all 64 bit JVMs no extra memory was needed for the extra field because of the 'dead' space needed for 8 byte object alignment.
  • Throughput doesn't suffer as tested with 400 JMH benchmarks available online.
  • The reason for this is that String is highly optimized in that there 55 specific JVM features for String alone.
  • Latency also improved tested with industry benchmark SPECjbb2015 also regression tested on SPECjbb2005
  • Feature can be enabled and disabled with -XX:+CompactStrings but will be enabled by default.


Friday 5 February 2016

How to set up repository authentication with Gradle


  • Setting up repository authentication with Gradle
In the previous post I showed you how to move a project from maven to Gradle. One of the issues I had was that authenticated repositories no longer worked (in Maven they were using the setting.xml file in the .m2 directory). I'm sure this is standard knowledge for any Gradle user but it took a little figuring out as a Maven user.

First create a file called gradle.properties and same it into the same directory as your build.gradle. It doesn't have to live there but it's a good place to start. See more here.

Add the following lines to the gradle.properties file:

repoUser=user123
repoPassword=123abc

Then in your build.gradle add the following:


repositories {
    maven {
        credentials {
            username repoUser
            password repoPassword
        }
        url "http://nexus........."
    }
}

Moving from Maven to Gradle in under 5 minutes


  • How to move a project from Maven to Gradle
For mainly historic reasons I've been a heavy Maven users for all my projects and not really dipped more than a toe into the 'holy grail' that is Gradle.

So I was pleased to be set the challenge by one of my clients, that as part of the delivery they wanted the code moved from Maven to Gradle.


After a bit of research (as well as some trial and error) I can take you through the steps that should be able to convert a Maven project to Gradle in about 5 minutes. (Note I've used IntelliJ but I would imagine this should be pretty much the same on any other IDE - or even if you're not using an IDE). 


  1. Install Gradle on your machine.  You can get the software from here.
  2. Check out (or copy) your code into a new directory.  This is not strictly necessary but it makes things cleaner.
  3. cd into the directory that contains your pom.xml
  4. Run the command: run gradle init.  This will create a new gradle project creating a build.gradle file based on your pom.xml.  (Note this is an incubator feature but it seems to work quite well).
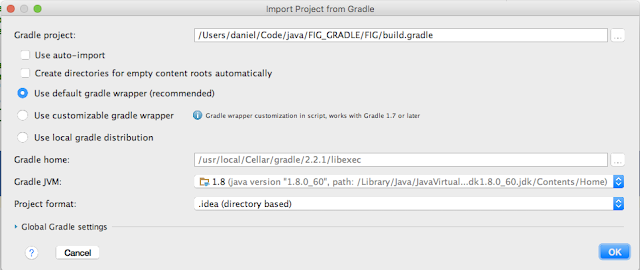
  5. Create a new IntelliJ project as follows:  File -> New -> Project From Existing Sources. Select the build.gradle file you created in the previous step and choose the following defaults as in this dialog:


    That's really all there is to it. A brand new Gradle project.

    Here are some additional notes I found useful as a Gradle newbie:
    1. If you want to include files you already have in your existing Maven .m2 repo add mavenLocal() as a dependency.
    2. Your dependencies get downloaded here (the equivalent of .m2): 
      .gradle/caches/modules-2/files-2.1
    3. This is the correct way to define jdk compatibility:def javaVersion = JavaVersion.VERSION_1_8;sourceCompatibility = javaVersion;targetCompatibility = javaVersion;
    4. To see the results of your tests as they are running add this method to your build.gradletest { testLogging {     events "started", "passed", "skipped", "failed", "standardOut", "standardError" }}
    5. If you have repositories that need authentication see here.